

Disclosure: This article contains affiliate links. We may earn a commission from purchases at no extra cost to you, which helps our travel content.
As someone who has photographed ancient temples in Southern India and misty mountain shrines in Japan, I never expected to find one of my most challenging photographic adventures beneath the desert of New Mexico. The first time I descended into Carlsbad Caverns, I felt like I had entered another planet—one where light behaves differently, where time seems suspended in calcium carbonate, and where my camera's settings required a complete recalibration. Bem-vindo ao submundo—welcome to the underworld, as we might say in Portuguese. This weekend journey transformed my understanding of cave photography and reminded me that sometimes the most profound beauty exists in darkness.

Preparing Your Gear for the Underworld
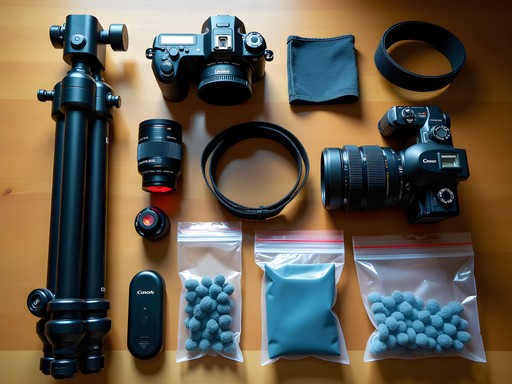
Before you descend into Carlsbad's limestone labyrinth, your equipment preparation will make or break your photographic expedition. The caverns present a unique technical challenge: extremely low light conditions combined with high humidity and temperature fluctuations that can wreak havoc on unprepared equipment.
First, a sturdy tripod is non-negotiable. The Big Room's expansive chambers demand exposure times that can extend to several seconds, sometimes even minutes. I learned this lesson the hard way during my first visit when I brought only a lightweight travel tripod that couldn't maintain stability during longer exposures.
Second, protect your gear from the cave's microclimate. The transition from New Mexico's dry heat to the cavern's 56°F (13°C) environment with nearly 90% humidity creates perfect conditions for lens condensation. I now carry a silica gel pack set in my camera bag to combat moisture issues. These reusable packs have saved my equipment multiple times, not just in Carlsbad but also during monsoon season shoots in India.
Finally, power management becomes critical underground. The cold environment drains batteries faster than normal, and the last thing you want is to discover your camera dying just as you reach the spectacular Hall of Giants. I always carry at least three fully-charged spares and keep them in an insulated battery pouch close to my body for warmth.

💡 Pro Tips
- Acclimate your gear gradually when entering and leaving the cave to minimize condensation
- Use a remote shutter release to eliminate camera shake during long exposures
- Pack microfiber cloths in ziplock bags to keep them dry until needed for lens cleaning
Mastering Light in the Darkness
In Carlsbad Caverns, light becomes both your most precious resource and your greatest artistic tool. The National Park Service has strategically illuminated the most spectacular formations, but these lights create extreme contrast scenarios that challenge even experienced photographers.
"A luz revela a verdadeira beleza das sombras," my mother used to say—light reveals the true beauty of shadows. This Brazilian wisdom perfectly captures the essence of cave photography. Rather than fighting the darkness, I've learned to embrace it as a compositional element. The negative space of deep shadows can dramatically frame the illuminated stalactites and stalagmites.
When setting up your shot, take time to study how the artificial lighting interacts with the formations. The park's lighting design creates intentional highlights and shadows that can guide your composition. I recommend using exposure bracketing extensively—I typically capture 3-5 exposures for each composition, ensuring I have details in both the brightest highlights and the darkest shadows for later HDR processing.
For supplemental lighting, avoid harsh flash that flattens the cavern's dimensionality. Instead, I've found success with a LED light panel set to its lowest power and warmest color temperature. This gentle fill light preserves the cave's mysterious atmosphere while subtly revealing textures in foreground elements.

💡 Pro Tips
- Use the histogram, not the LCD preview, to evaluate your exposure in the dark environment
- Consider shooting in RAW+JPEG to maximize post-processing flexibility
- Wait patiently for other tourists to move through your frame—their headlamps and flashlights can create interesting light trails with long exposures
Capturing the Living Cave
What continues to fascinate me about Carlsbad Caverns is that despite its seemingly static nature, it's actually a living, breathing entity. Water still drips, calcite still forms, and subtle changes occur over time. Capturing this sense of life and movement presents a unique photographic challenge.
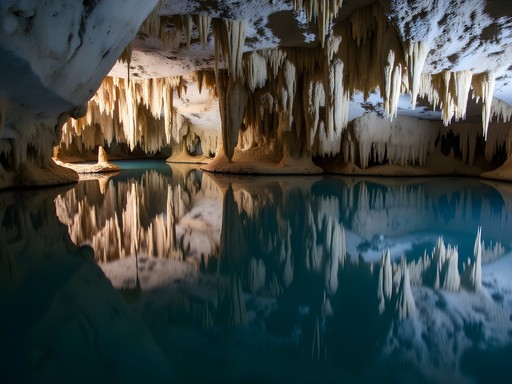
To convey the dynamic nature of the caverns, I focus on water features whenever possible. The Mirror Lake in the Big Room offers stunning reflection opportunities that double the visual impact of the formations above. For these shots, absolute stillness is essential—even the slightest vibration will disturb the water's surface and ruin the reflection. I've found that a weighted tripod hook allows me to hang my backpack beneath my tripod for added stability during these critical shots.
The famous Bottomless Pit presents another opportunity to convey depth and mystery. Rather than trying to illuminate the darkness, I compose shots that emphasize the unknown—the edge where light fades into absolute blackness. These images often evoke the strongest emotional responses from viewers.
Don't overlook the subtle colors present throughout the cave system. While the dominant palette appears monochromatic at first glance, extended exposure times reveal delicate oranges, greens, and blues in the mineral deposits. To capture these accurately, I use a color calibration card to set proper white balance in the challenging mixed lighting conditions.

💡 Pro Tips
- Look for water droplets on formations—they can create beautiful specular highlights when properly lit
- Use long exposures of 15+ seconds to capture the subtle movement of water in formation pools
- Consider focus stacking for close-up shots of delicate formations to maintain depth of field without diffraction

The Bat Flight Experience
No photographic exploration of Carlsbad Caverns would be complete without witnessing the spectacular bat flight that occurs at dusk. From May through October, hundreds of thousands of Brazilian free-tailed bats spiral out of the Natural Entrance in a mesmerizing display that challenges even the most experienced wildlife photographer.
First, understand the rules: the National Park Service prohibits all photography during the bat flight program. This is non-negotiable, and for good reason—flashes and electronic sounds can disturb the bats' behavior. However, you can capture the experience before and after the main event.
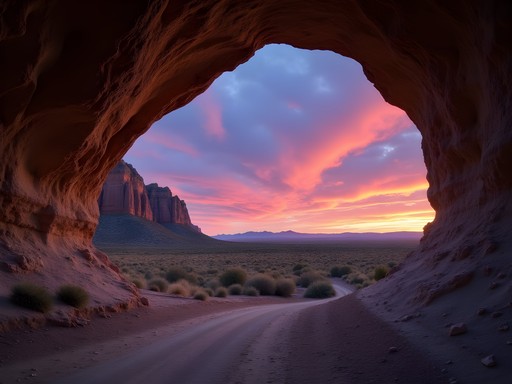
I arrived at the amphitheater two hours before the scheduled bat flight to photograph the landscape in the golden hour light. The desert surroundings take on a magical quality as the sun sets behind the Guadalupe Mountains. This contextual photography helps tell the complete story of the caverns' environment.
For comfortable viewing of this lengthy event, I highly recommend bringing a portable seat cushion. The amphitheater has concrete seating that becomes uncomfortable during the hour-plus program. My back thanked me for this small luxury!
After the bats departed and photography restrictions lifted, I captured the twilight sky above the cave entrance. The transition from day to night mirrors the journey from surface to underground that visitors experience—a poetic bookend to the Carlsbad photography experience.
"A natureza nos conta histórias, se tivermos paciência para ouvir," as we say in Brazil—nature tells us stories if we have the patience to listen. The bat flight is one of those stories, told in the language of movement and silhouette.

💡 Pro Tips
- Arrive early to secure a good viewing position in the amphitheater
- Bring a light jacket as temperatures drop quickly after sunset in the desert
- Use the bat flight program as an opportunity to simply observe and plan your next day's photography
Post-Processing the Underworld
The technical challenges of cave photography don't end when you ascend back to the surface—in many ways, they're just beginning. The extreme dynamic range and unusual lighting conditions of Carlsbad Caverns demand thoughtful post-processing to translate what your eyes experienced into what your camera captured.
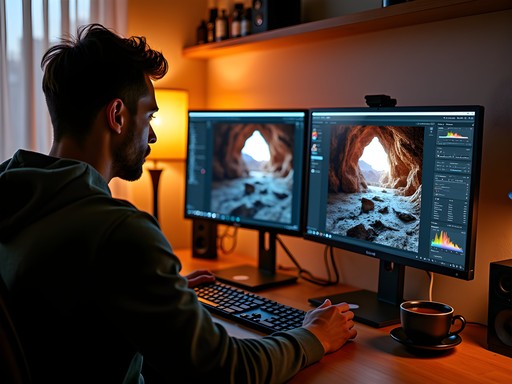
My workflow begins with careful organization. I separate my images into categories based on location within the caverns, as each area presents unique processing challenges. The King's Palace requires different treatment than the Big Room or the Natural Entrance.
For exposure blending, I've found traditional HDR software often produces unnatural results with cave photography. Instead, I use luminosity masks in Photoshop to manually blend exposures, preserving the natural contrast and three-dimensionality of the formations. This technique takes longer but produces more authentic results that honor the cavern's true appearance.
Noise reduction becomes critical for cave images due to the high ISOs often required. I've tested many solutions, but the noise reduction software consistently preserves the fine details in stalactites while smoothing shadow noise. When processing hundreds of cave images, this specialized tool has saved me countless hours of manual noise reduction.
Finally, I approach color correction with restraint. While it's tempting to boost saturation to reveal more of the subtle mineral colors, I've learned that subtlety better captures the mysterious atmosphere of the caverns. I aim for a balance that looks natural yet reveals details that might be missed by the naked eye—enhancing the experience without fabricating it.

💡 Pro Tips
- Create a consistent processing style for your entire Carlsbad series to maintain visual cohesion
- Use selective clarity adjustments to enhance texture in formations without affecting shadow areas
- Consider creating black and white conversions—the dramatic light and shadow of caves often works beautifully in monochrome
Final Thoughts
As I packed away my gear after three days exploring Carlsbad Caverns, I realized this underground journey had shifted something fundamental in my approach to photography. The caverns demand technical precision, yes, but they also reward patience and contemplation in ways few other environments do. The limestone formations—sculpted drop by patient drop over millennia—mirror the photographic process itself: gradual accumulation leading to something beautiful.
For photographers accustomed to the controlled environments of studios or the predictable patterns of golden hour light, Carlsbad offers a necessary challenge that expands both technical skills and artistic vision. It forces us to see differently, to find beauty in darkness, and to work within constraints that ultimately make us more versatile creators.
When you visit, allow yourself time to simply sit in the darkness between shots. Listen to the subtle sounds of water droplets that continue the cave's creation even now. As we say in Hindi, "अंधेरे में भी रोशनी है"—there is light even in darkness. Carlsbad Caverns will teach you to find it, frame it, and bring it back to the surface world through your images.
Until next time, keep your batteries charged and your curiosity endless.
✨ Key Takeaways
- Cave photography requires specialized gear preparation, particularly for moisture protection and power management
- Embrace the extreme contrast rather than fighting it—use darkness as a compositional element
- Patience is essential—both for technical reasons (long exposures) and to capture the living nature of the cave
- Post-processing requires a delicate touch to maintain authenticity while revealing hidden details
- The technical challenges of cave photography will strengthen your skills for all other photographic pursuits
📋 Practical Information
Best Time to Visit
Year-round for cave photography; May-October for bat flights
Budget Estimate
$150-300 for weekend (park fees, accommodations, meals)
Recommended Duration
2-3 days minimum
Difficulty Level
Intermediate (Physical Demands And Technical Photography Challenges)


Comments
globelegend
that shot of the stalagmites is unreal
wavehero
Love these photos, definitely adding to my list
Jose McDonald
Dude, YES! The bat flight experience is absolutely wild! I went last summer and timed it for the evening exodus - watching thousands of bats spiral out of the cave entrance was one of the most surreal natural phenomena I've ever witnessed. Your photos really capture that chaos and energy. For anyone planning to shoot this, get there EARLY for a good spot at the amphitheater. I brought my telephoto lens which was clutch for getting close-up shots without disturbing them. The rangers are super strict about no flash photography (obviously), so high ISO capability is essential. Also, the whole experience is way more dramatic than I expected - the sound alone is incredible!
nomadway
Going there next month! Any tips for a first timer?
Jose McDonald
Wear layers! It's way cooler underground than you'd expect in the desert.
Casey Andersson
Marco, your section on mastering light in the darkness really resonated with me. I visited Carlsbad last year and completely underestimated how challenging the lighting would be. The ambient cave lighting creates such strange color casts that I spent hours in post-processing trying to correct. Your tip about bracketing every single shot is spot on - I wish I'd done more of that. The Big Room at sunset time was absolutely magical, and I love how you captured that ethereal quality in your images. Did you find the humidity affected your gear at all? I had some minor lens fogging issues transitioning between chambers.
globelegend
humidity is real down there, had same issue
moonrider
This looks AMAZING!! Quick question - do they actually let you use tripods down there? Planning a trip in spring and want to make sure I bring the right stuff!
Casey Andersson
They do allow tripods in most areas! Just be mindful during busy times - the pathways can get crowded.
moonrider
perfect thanks!!
sunnyfan
those cave shots are incredible!
sunnyace
is it cold down there? wondering what to wear
bluequeen
its around 56 degrees year round, bring a light jacket
vacationace
Thanks for sharing this!
Megan Martin
This is a comprehensive guide, Marco. I've shot in several cave systems across the Southwest and your point about white balance is spot-on. The artificial lighting creates such challenging color casts. I typically shoot in RAW and bracket my white balance settings. For anyone planning a trip, note that Carlsbad has strict rules about flash photography to protect the cave ecosystem. I brought my fast lens which performed beautifully in low light without disturbing the environment. The self-guided route takes about 90 minutes at a photography pace.
Venture X
Premium card with 2X miles, $300 travel credit, Priority Pass